Hands-on:
Ada on Android and Android wear!
(using native code)
This hands-on describes how to use a
native Ada application on an Android device (ARM processor) without
having to 'root' your device. This page has been updated for using the
Android Studio and Android wear devices.
11/02/2017
|
Minor
update: The
main process is now created using the ProcessBuilder. |
25/10/2021
|
Update:
The problem that caused this solution to stop
working on
devices running Android 10 or later has
been solved!
This solution now works for old and more recent versions of Android!. |
03/10/2022 |
Due to
termination of the xs4all provider web server, this page was moved to http://decijferij.nl/software/Ada
on Android.html
|
There has been some effort in getting native compilers to
generate code for the Android platform. For C/C++ you could use the
Android NDK which will help you to build and call a native code.
However
most other languages are not supported by the NDK (yet).
<Plug> If
you can spend
the money, there is now a very nice supported GNAT compiler available
which allows integration of the Java and Ada development in Eclipse. </Plug>
But if you just want to try things out, this hands-on approach may
still work for you :-)
There have been interesting posts on building a native gcc compiler for
C/C++ and Fortran (Check out http://specificimpulses.blogspot.com/2011/01/my-android-speaks-fortran-yours-can-too.html)
But you can also use a native compiler for Ada! It can be found
here (http://www.dragonlace.net/).
This native Ada compiler was ported to the FreeBSD OS by John Marino.
Thanks John!
Now lets get started. Here are the major steps:
- Create a native Ada program for
the ARM processor.
- Create an Android app in Eclipse
or Android Studio.
- Deploy the app on your device.
1. Create a native Ada
program for the
ARM processor.
To build the Ada program, you need to install the GNAT-AUX Android
(GNATDroid) compiler on a *BSD system.
- (If you already have a FreeBSD or PC-BSD system, you can skip
this
step)
To generate the native ARM code, I created a PC-BSD 10.1 VirtualBox
virtual machine. The reason I picked PC-BSD was because it is based on
FreeBSD and comes with a pre-installed GUI. This also allows you to use
the GNAT-AUX version of GPS to maintain your Ada code.
The virtual machine for PC-BSD was easily created using a generic Open
Virtualization install
file (OVA), which can be found here
PCBSD 10.1. You can use either VMWare or VirtualBox and
import this virtual machine.
Make sure your virtual machine has access to the internet.
To make installation of this virtual machine a little easier, I have
added a few instructions
(also includes manual installation of GNATDroid).
Next I developed a small hello world Ada program:
with Ada.Text_IO; use Ada.Text_IO;
procedure hello_ada is
begin
loop
declare
Line : String := Get_Line;
begin
Put_Line ("Hello from Ada!, You entered: " & Line);
exit when Line'Length = 4 -- '
and then Line = "exit";
end;
end loop;
end hello_ada;
Now you can build the executable using the command:
arm-android-eabi-gnatmake hello_ada.adb -largs -fPIC -pie
Note that the flags '-largs -fPIC -pie' are optional for older phones
but
required for devices running Android lollipop and later versions
(including wear devices).
Next, copy the executable (hello_ada) back to the Android development
environment, in my case Windows.
2. Create the Android app.
For the development of Android apps, I use Windows but any OS that
supports building Android apps should do as well.
- Install the latest version of Android
Studio
for your platform, and download the appropriate SDK's and the NDK
plug-in using the SDK Manager. The NDK can be found under SDK tools.
- Create a new blank (no activity)
Android application
project in
Java called
'hello_ada' and choose your target device. Also pick a package name:
'com.hello_ada' (remove the term 'example'), select the required SDK
level and you may also need to check
'use legacy android.support libraries' for this example.
Note: I used API 30 (Android 11.0) for this example, but other
targets are
also possible, and you can later change the minSdk value in
build.gradle for compatibility with older devices..
- Complete the
dialog by clicking 'Finish''. (You now
should have created a project without Java sources)
Android Studio will now prepare the project. Grab some coffee, this may
take a while.
- Add an Empty Activity named
MainActivity and check
'Launcher Activity'
(language is Java).
- Modify the AndroidManifest.xml
file and add
'android:extractNativeLibs="true"
' to the Application.
- By now you should have a project
and a file called
MainActivity.java.
What needs to be done (so we can get some output too) is create a
'Multiline
Text' editText control (under 'Text') called editTextTextMultiLine.
This can
be done by editing res/layout/activity_main.xml
using the graphical editor. Set the number
of lines to say 30 (lines=30, width=800px) and perhaps add scrollbars
too.
- What still needs to be done is
adding the native Ada
executable (from PC-BSD) to this project.
In Android Studio perform a right-click on 'app' (project view) and
select
'new', 'directory'. Type the name: src/main/jniLibs/armeabi-v7a
and/or src/main/jniLibs/arm64-v8a
depending on your target platform (or create both for compatibility).
Use a file explorer to
copy the 'hello_ada' executable to this directory and rename it to
'libhello_ada.so'.
(On your
filesystem
this should be <project
directory>/hello_ada/app/src/main/jniLibs/arm...).
Important:
The executable name must begin with 'lib' and end with '.so' or else
the
package manager/installer will not copy the file on your Android device
into the lib/arm or lib/arm64 directory!
Using the 'jniLibs/arm...' directory, native code can be added to the
.apk file
which can later be installed on your Android device (or even Android
wear devices). This way the
executable file gets the same owner id as the app, so that the app can
run it without the need to have root privileges!
On the Android device, the executable 'libhello_ada.so' is stored in a
/data/app/com/hello_ada-xxx/lib/arm(64) directory. This directory is
protected, so your app can not modify any property (i.e. the name) of
the copied
executable.
Now it is time to add the Java code for interacting with Ada :-)
Here's the Java source (MainActivity.java) that does the trick:
package com.hello_ada;
import java.io.BufferedReader;
import java.io.BufferedWriter;
import java.io.File;
import java.io.IOException;
import java.io.InputStreamReader;
import java.io.OutputStreamWriter;
import android.content.Context;
import android.content.pm.ApplicationInfo;
import android.content.pm.PackageManager;
import androidx.appcompat.app.AppCompatActivity;
// import android.support.v7.app.AppCompatActivity;
import android.os.Bundle;
import android.widget.EditText;
public class MainActivity extends AppCompatActivity {
/* Called when the activity is first created. */
private void logProcess (Process pr, EditText t) throws IOException
{
/* This routine reads the output and error streams from a process */
/* and logs it to an EditText object. */
int read;
char[] buffer1 = new char[4096];
StringBuffer output = new StringBuffer();
try
{
BufferedReader reader = new BufferedReader(new InputStreamReader(pr.getInputStream()));
while ((read = reader.read(buffer1)) > 0) {
output.append(buffer1, 0, read);
t.append(output.toString() + "\n");
}
reader.close();
BufferedReader errReader = new BufferedReader(new InputStreamReader(pr.getErrorStream()));
while ((read = errReader.read(buffer1)) > 0) {
output.append(buffer1, 0, read);
t.append(output.toString() + "\n");
}
errReader.close();
}
catch (Exception e) {
t.append("Exception " + e.getMessage());
e.printStackTrace();
}
}
@Override
public void onCreate(Bundle savedInstanceState) {
super.onCreate(savedInstanceState);
setContentView(R.layout.activity_main);
EditText log_text = (EditText) findViewById (R.id.editTextTextMultiLine);
log_text.setText("Test native app\n\n");
Process process = null;
Context context = getApplicationContext();
PackageManager pm = context.getPackageManager();
try
{
ApplicationInfo appInfo = pm.getApplicationInfo("com.hello_ada", PackageManager.GET_SHARED_LIBRARY_FILES);
// log_text.append("native lib dir: " + appInfo.nativeLibraryDir + "\n\n");
String data_dir = appInfo.nativeLibraryDir;
String filename = "/libhello_ada.so";
File hello_ada_file = new File (data_dir + filename);
/* Check if the executable exists */
process = Runtime.getRuntime().exec("ls -l " + data_dir + filename);
process.waitFor();
logProcess (process, log_text);
/* Start the Ada process */
// You can use the ProcessBuilder or just call 'exec'.
//ProcessBuilder prb = new ProcessBuilder ("." + data_dir + filename);
//process = prb.start();
process = Runtime.getRuntime().exec("." + data_dir + filename);
log_text.append("process started\n\n");
/* Open streams to this process. It should be running now */
/* and waiting for input. */
BufferedWriter writer = new BufferedWriter(new OutputStreamWriter(process.getOutputStream()));
BufferedReader reader = new BufferedReader(new InputStreamReader(process.getInputStream()));
/* Now you can send text (or commands!) to the Ada program */
writer.write("Hello from Java!\n");
writer.flush();
/* Read the result */
log_text.append("Received: " + reader.readLine() + "\n\n");
/* Make sure the Ada process terminates: */
writer.write("exit" + '\n');
writer.flush();
log_text.append("Received: " + reader.readLine() + "\n\n");
} catch (IOException e) {
/* TODO Auto-generated catch block */
log_text.append("io exception: " + e.getMessage());
e.printStackTrace();
} catch (InterruptedException e) {
/* TODO Auto-generated catch block */
log_text.append("interrupted exception: " + e.getMessage());
e.printStackTrace();
} catch (Exception e) {
log_text.append("exception: " + e.getMessage());
e.printStackTrace();
}
}
}
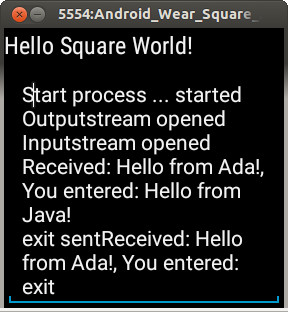
3. Deploy the app on your
device.
After you compiled and built this program, you should have an apk
file in your project
directory: '~/AndroidStudioProjects/hello_ada/app/build/outputs/apk' that you can
copy to an Android device and install it. To do this, you must change
the security settings on your device to allow installing apps from
other sources.
As a side note, using bufferedReader to communicate with your fast Ada
code obviously has a performance penalty so you should minimize your
interactions (on a tablet a round trip communication takes less than
half a millisecond).
For Android wear devices I created a project that can be downloaded here. (v7a)
You can download this project and import it into Android Studio. For
debugging your smartwatch checkout this
page.
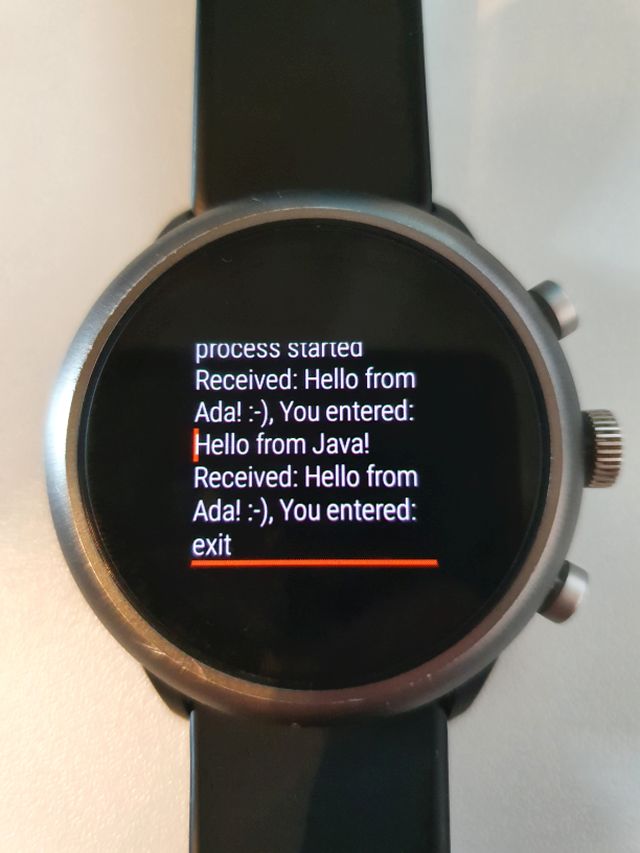
On my fossil smartwatch it looks like this:
Enjoy !
Rob
To make things easy, I already built the native
module (ARM V7) you can integrate into your app. Or just download
the complete Android Studio project.
If you just want to see it running, here's a hello_ada.apk
app.
This version of the app should work on Android version 4.1 and higher.
If you have questions or comments, just send me an e-mail.